Ripping DVDs for the GP2X
So you're got your sexy handheld console and you've downloaded the
games and put your MP3 collection onto SD card and all is well. . . But
you've got this large, high-quality colour screen and you want to make
more use of the multimedia. It's time to think about movies.
Before going any further, I should caution you that copying copyright
media from disc to computer is illegal in some places, even when you
own both. Copying (or downloading) copyright media that you don't
own is illegal almost everywhere. This guide is intended for use solely
by people who own the DVDs and are legally permitted to copy it for
their own use. So don't sue me, please, you *AA bods! ;o)
Now then: To business. The GP2X is Linux based, and its movie player is
based on the popular Mplayer
software. Mplayer comes with a DVD-ripper, Mencoder. It's great, but
it's CLI based. While I'm the first to agree CLI has many advantages
over GUIs, mencoding for the GP2X consists of lines like
mencoder
dvd://1 -dvd-device /dev/dvd -alang English -oac mp3lame
-lameopts abr:br=10:mode=3:aq=0 -af volume=8:sc -ovc xvid -xvidencopts
:bitrate=130:pass=1 -vf
pp=de,eq2=1.0:1.5:0.1:1.4,crop=716:410:2:82,scale=320:-2 -ofps 10
-srate 11025 -o "/dev/null"
mencoder dvd://1
-dvd-device /dev/dvd -alang English -oac mp3lame -lameopts
abr:br=10:mode=3:aq=0 -af volume=8:sc -ovc xvid -xvidencopts
:bitrate=130:pass=2 -vf
pp=de,eq2=1.0:1.5:0.1:1.4,crop=716:410:2:82,scale=320:-2 -ofps 10
-srate 11025 -o "/root/indy3.avi"
and if that doesn't scare you, then you probably know too much to
benefit from this guide! ;o)
So I shall be explaining how to rip DVDs using another popular ripper,
namely dvd::rip.
If you're determined to use a different ripper, then just keep an eye
out for the technical stuff & you should be able to transfer
easily enough.
Installation of the software is beyond the scope of this guide: Consult
your package manager documentation. Once you've got it installed, run it and
you should see a screen like this:
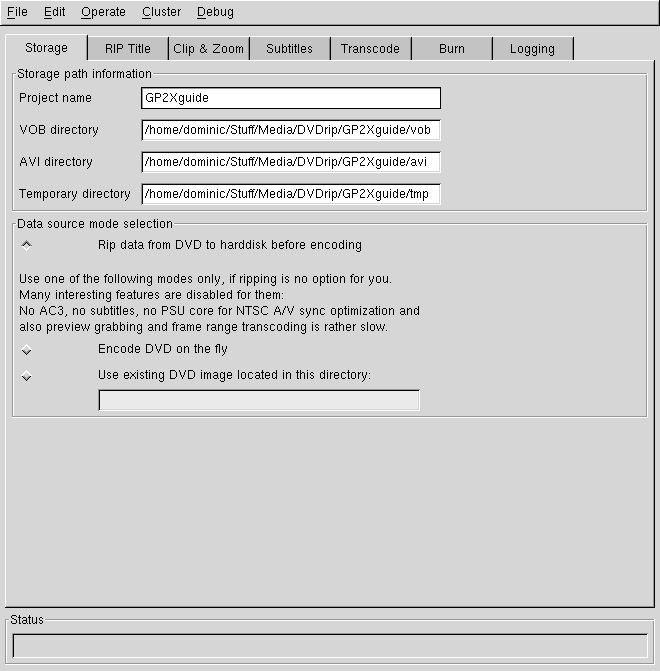
File
-> New Project. You'll
get asked for a name for the
project. I've called mine GP2Xguide, and as you will see, it fills in
the rest of the options for you:
Your
work here is done. Click the
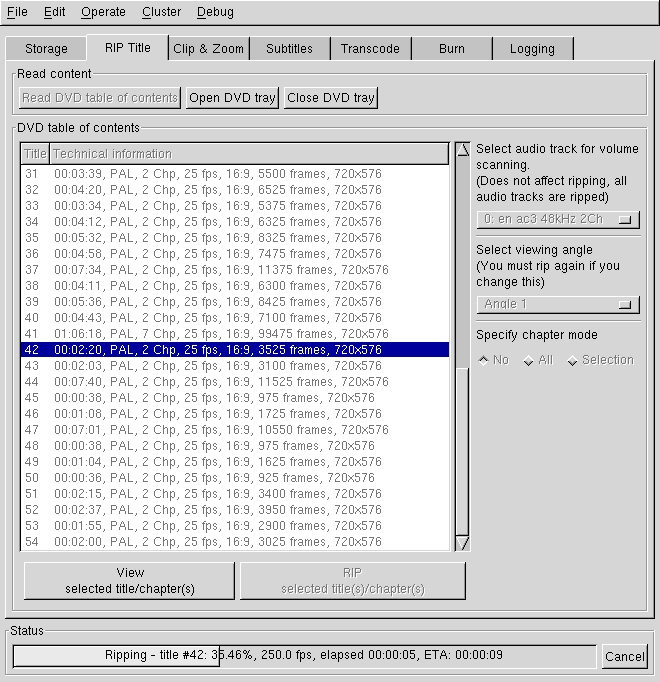
"Rip Title" tab, and read the DVD's
table of contents. This can take a while, so wait until the status bar at the bottom reaches 100% and the DVD drive light goes out before you assume it's finished. You should get something looking vaguely like this at the end:
Although usually you'll have rather less titles! This is a special
features DVD with lots of goodies, so it's rather busier than a typical
movie DVD. You get a lot of information. The bits that we care about
are:
- Which title corresponds to
what content - you don't want to spend half an hour ripping a DVD only
to find it was the wrong title! The "View selected" button can be handy
here
- Duration of the title -
longer times means bigger files
- Number of chapters the title
is broken into - if we want to divide up the individual episodes that
make up a title, we'll need to check the "Selection" box in the Chaper
Mode section
The rest we can mostly ignore.
Firstly,
decide what you want to
rip. Highlight multiple titles or
chapters by holding down the CTRL key while mouse-clicking. Once you've
got everything, click the "Rip selected titles" button. Take a break
while it reads the disk: You'll get a status bar at the bottom telling
you how long it's going to take.
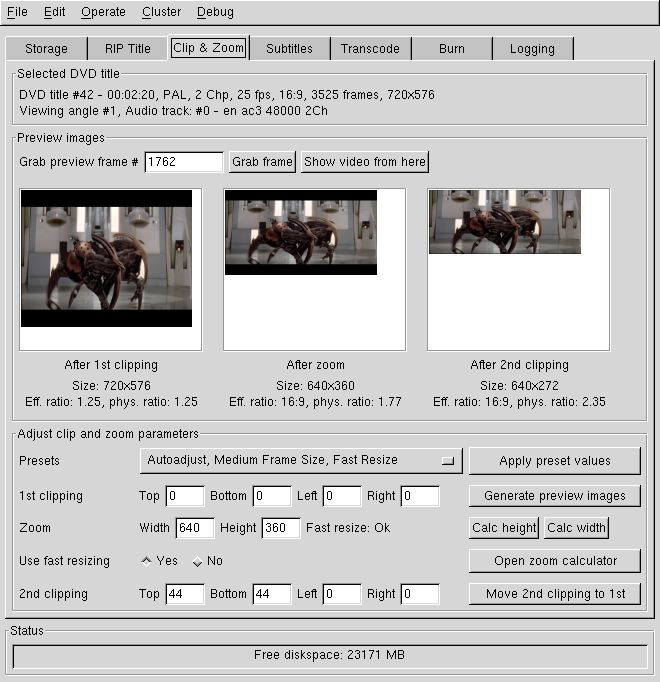
Once
you've ripped, move to the
next tab. You'll see a random
thumbnailed frame from the movie you just ripped, in several stages of
its life. Click the thumbnail for a full-sized image. In this example,
you see the raw, mis-shapen image; the resized widescreen-aspect image;
and the de-black-barred image. You might be starting to guess what
movie you're dealing with here. . .
At this point, you start to need the technical details of the GP2X, as
you need to resize the image to fit the screen. So here's what you need
to know:
| Screen size: |
320x240 actual size, but
can play videos up to 720x480 |
| Video formats: |
MPEG, DivX 3-5, Xvid |
| Frame Rate: |
up to 30fps |
| Video bitrate: |
up to 2500kbit/s |
| Audio bitrate: |
up to 284kbit/s |
| Captions: |
SMI |
As you can see, the default screen size selected by dvd::rip is small
enough, so we can move right along here.
Subtitles
are not a subject I
know much about, I fear. And on the GP2X
you're just asking for eyestrain. Unless you really need them, I
suggest skipping them completely and going straight to the really
technical bit: Transcoding
This
is where you need to know
most of what's in the table above. Let's
work through it, shall we?
Container:
AVI.
Video
Codec: Up to you. I
personally like Xvid, but at the time of
writing, it's not well supported, so I fall back on divx5
Framerate:
Anything up to 30.
This movie was only 25fps, so that's what
I've left it at.
2-pass
encoding: This doubles
the transcoding time, but gives you a
better quality movie at the end, for no extra space. Worth doing.
Deinterlace
mode: TV screens
work by drawing every odd line of an
image, then every even line, then every odd line, and so on. As a
simple example, consider a simple 3-frame animation showing a face
moving across the square. What you want
is something like this:

But what your TV shows you is something
more like this:
Every other line, you see.
The awkward thing is, of course, that superimposing one image on the
other doesn't give you the proper image, so your computer has to do
some clever things behind the scenes, to turn this:
into this:
So watch the movie & see if you get
lines when something moves fast across the screen. If so, you've got
interlacing. Use "Zoom To Full Frame" for best results, but it'll take
a lot longer to rip.
Filters:
You can usually ignore
this
Bitrate
calculations: dvd::rip
uses two ways to set this. Either tell
it how much space you have, and it'll give you the highest quality; or
tell it what quality you want by checking the "manual" button and
filling in a bitrate of no more than 2500
Audio
options: The audio track
is usually right, but not always. The
only other thing you may want to change is the quality: Setting it to
two is much quicker & doesn't give any real loss of quality.
General
options: This is where
we will generate a quick preview to make
sure all is well, and also make sure the transcoding doesn't lock up
our PC.
Set the frame range to something small, like ten seconds. You'll
probably want it a reasonable way into the movie to make sure there's
something worth watching, such as 1000 to 1250. Lastly, set the nice
level to fifteen or so. This will ensure that your ripper
only uses free resources, so your PC will remain perfectly useable.
We're now ready to take a look at our video clip. Click Transcode. My
machine takes 13 seconds on this particular task, so we're not
expecting much of a wait here.
Once the coding is finished, click "View AVI" and check that it looks
okay. If it doesn't, there are two likely culprits: Improper image
quality, which is solved by fiddling with the bitrate; and sound is out
of sync with the video. Don't meddle with sound until you've sorted the
bitrate: Changing the bitrate can create or remove synch issues.
Clip 1
(2.5MB, right-click to save to your machine)
Once
you're satisfied, clear the frame range. It's time to transcode this
puppy. It'll be a 44.37MB file, so it might take a while.
Since we're waiting, I'll tell you about what I'm ripping. It's the
first trailer I ever downloaded off the Net, back in the days before
broadband. But it was worth it: The film had been hyped so much, after
all, everybody wanted to see the trailer. Remember the news stories
about people going to see a film at the cinema just so they could watch
the trailer?
Star Wars episode one: The Phantom Menace. How cool did the idea of a
double-bladed saber seem back then? :o)
I chose this one partly for the nostalgia, and partly because it has
both fast-paced action shots and slower scenes that wil help to
emphasize the difference bitrates can make in such matters.
So, the trailer is transcoded, and here it is, in all it's 44MB,
640x272, 2500kbit/s glory. Looks good on the GP2X. Heck, looks good on
my 1280x1024 monitor!
Clip 2
(45MB)
But
more than 20MB per minute is.
. . well, it's going to need a lot of
SD cards to get the whole film on at this rate! SW1 is 131 minutes
long: 2.6 gigs at our current rate. Ouch.
So let's look at cropping out some deadwood. Firstly, let's go back to
the screen size in "Clip & Zoom". 640x272 is all well and good,
but the GP2X screen is only 320x240. Unless we're going to hook it up
to a
high-def TV, it's overkill. Let's halve the screen size. Go down to the
Zoom
options, replace 640 with 320, and then click the "Calc height" button.
Then a top&bottom clip of 22 to trim the black bars. This gives
us a final size of 320x176.
Back to the transcode tab. The calculated size of the movie is still
the same, because the bitrate is still the same. 2500 was good enough
for the big movie. Halving in size quarters the screen area, so 625
would presumably give a pretty good quality image, right?
Let's see how this movie looks now it's only 12.86MB
Clip 3
(13MB)
Pretty good, I think. Okay, it's no longer looking that wonderful at
fullscreen on my monitor, but on a GP2X, it's fine. 6MB a minute is
pretty reasonable: The whole film will be 786MB now, which'll easily
fit on a 1GB card.
(You may notice that the audio & video are slightly out of synch on this version - a perfect example of why you shouldn't play around with the synching until you're happy with the video settings you're using!)
But can we go any lower. . ?
Well,
that depends on the type of
film. For a less action-packed film,
a bitrate of 300 will actually do pretty well. Observe:
Clip 4
(7.3MB)
For a file under 8MB, that's not all that bad, for the most part, is
it? It's not great, of course, but for the easier scenes it renders
pretty well. The 'busier' scenes are less wonderful, of course.
Depending on the movie you're ripping, this could be good enough - A
bitrate of 300 worked great for Wallace
& Gromit films
on the
Gp2X!
And
if you're not quite sure what
a movie looks like with a too-low
bitrate, let's give you a 100kbit/s example to clear it up ;o) Even
here, a few scenes are pretty good, but it's mostly lousy. This
illustrates the need to look at more than just one scene when sampling
your bitrate: A scene that's too easy to transcode will give a falsely
low bitrate requirement for the rest of the film.
Clip 5
(4MB)
That pretty much covers everything. You should now know everything you
need to get a DVD movie onto your GP2X at an acceptable quality level
with minimal tinkering.
If you want even more information, I recommend the guide to ripping by Moritz
Bunkus and/or the GP2X
forums.
 This
work is copyright and belongs to Dominic Humphries. It may be
redistributed under a Creative
Commons License. This page's URL
must
be supplied in attribution.
This
work is copyright and belongs to Dominic Humphries. It may be
redistributed under a Creative
Commons License. This page's URL
must
be supplied in attribution.
The trailer used as illustration is copyright Lucasfilm Ltd.